Simple Gluster Lab
Contents
Introduction⌗
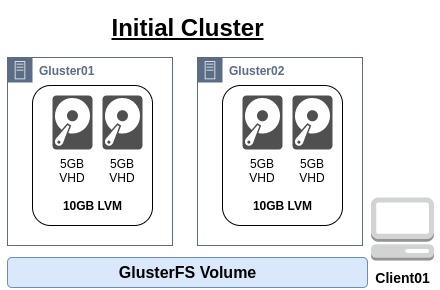
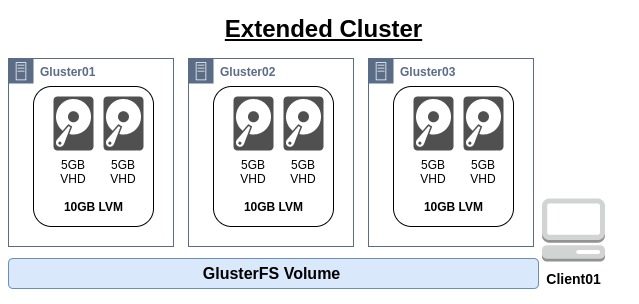
In this lab we will build out a small, 2 node Gluster cluster using 2 bricks to back a single volume. This will then be mounted to a client and tested, before a third Gluster node is added bringing the number of bricks in the cluster to 3.
This guide assumes that Libvirt is setup and configured on the host machine.
- Initial Cluster
- Extended Cluster
Initial Cluster build⌗
Before starting:
- Ensure public ssh key is available in
~/.ssh/ - Ensure the CentOS 7 image is available here
/var/lib/libvirt/images/iso/CentOS-7-x86_64-GenericCloud.qcow2
Setup VMs⌗
To build out the initial lab, the scripts are available on GitHub.
- Checkout the setup and tear down scripts from GitHub
git clone https://github.com/greeninja/kvm-gluster-lab.git
- Move to the newly checked out folder
cd kvm-gluster-lab
- Modify the variable in the script to setup Root Password, Public SSH Key and Base OS location
vim setup.sh
- Once the variables have been set, run the script. This will set up all 4 of the VMs to save time.
bash setup.sh
Example output
**********
[   5.8] Setting up initial partition table on /var/lib/virt/nvme/client01.gluster.lab.qcow2
[   6.6] Copying /dev/sda1
 100% ⟦▒▒▒▒▒▒▒▒▒▒▒▒▒▒▒▒▒▒▒▒▒▒▒▒▒▒▒▒▒▒▒▒▒▒▒▒▒▒▒▒▒▒▒▒▒▒▒▒▒▒▒▒▒▒▒▒▒▒▒▒▒▒▒▒▒▒▒▒▒▒▒▒▒▒▒▒▒▒▒▒▒▒▒▒▒▒▒▒▒▒▒▒▒▒▒▒▒▒▒▒▒▒▒▒▒▒▒▒▒▒▒▒▒▒▒▒▒▒▒▒▒▒▒▒▒▒▒▒▒▒▒▒▒▒▒▒▒▒▒▒▒▒▒▒▒▒▒▒▒▒▒▒▒▒▒▒▒▒▒▒⟧ 00:00
[  22.8] Expanding /dev/sda1 using the ‘xfs_growfs’ method

Resize operation completed with no errors.  Before deleting the old disk,
carefully check that the resized disk boots and works correctly.
Customising OS for client01
[   0.0] Examining the guest ...
[   8.4] Setting a random seed
[   8.4] Uninstalling packages: cloud-init
[  10.6] Setting the hostname: client01.gluster.lab
[  10.6] SSH key inject: root
[  12.6] Setting passwords
[  14.4] SELinux relabelling
[  30.7] Finishing off
Defining client01

Starting install...
Domain creation completed.
 Id    Name                    State
----------------------------------------
 123   gluster01.gluster.lab   running
 124   gluster02.gluster.lab   running
 125   gluster03.gluster.lab   running
 126   client01.gluster.lab    running
Now the VMs are up and running, we will shutdown
gluster03before continuing
virsh shutdown gluster03.gluster.lab
Setup Gluster⌗
There will be 2 versions of this setup. The first is manually setting up and configuring Gluster and the second will configure the cluster with Ansible.
With either setup, we will need the VMs IP addresses from DHCP
virsh net-dhcp-leases gluster-lab
- Example output
 Expiry Time           MAC address         Protocol   IP address       Hostname    Client ID or DUID
------------------------------------------------------------------------------------------------------
 2021-01-19 09:48:35   52:54:00:00:5e:1e   ipv4       10.44.50.96/24   gluster02   -
 2021-01-19 09:47:41   52:54:00:14:2a:19   ipv4       10.44.50.22/24   gluster01   -
 2021-01-19 09:49:31   52:54:00:93:15:e5   ipv4       10.44.50.86/24   gluster03   -
 2021-01-19 09:50:24   52:54:00:f1:36:77   ipv4       10.44.50.63/24   client01    -
Manual Setup⌗
The following steps need to be taken on each of the Gluster nodes.
- (Optional) Install a text editor of choice.
viis available on the nodes
yum install -y vim
- Install the Gluster yum repository. Here we will be installing Gluster 6 so that this lab can be used for a future lab.
yum install centos-release-gluster6 -y
- Now install glusterfs server
yum install glusterfs-server -y
- Enable the Gluster service
systemctl enable glusterd
- Start the Gluster service
systemctl start glusterd
- Add the first disk to a Physical Volume
pvcreate /dev/vdb
- Add the second disk to a Physical Volume
pvcreate /dev/vdc
- Confirm both drives are visible as Physical Volumes
pvs
Example output
  PV         VG Fmt  Attr PSize PFree
  /dev/vdb      lvm2 ---  5.00g 5.00g
  /dev/vdc      lvm2 ---  5.00g 5.00g
Create the Volume group
vgcreate brick /dev/vdb /dev/vdc
- Check the Volume Group
vgs
Example output
  VG    #PV #LV #SN Attr   VSize VFree
  brick   2   0   0 wz--n- 9.99g 9.99g
Create the Logical Volume for the Gluster brick
lvcreate -l 100%FREE -T brick -n brick01
- Check Logical Volume has created
lvs
Example output
  LV      VG    Attr       LSize  Pool Origin Data%  Meta%  Move Log Cpy%Sync Convert
  brick01 brick twi-a-tz-- <9.97g             0.00   10.61
Create a filesystem on the Logical Volume
mkfs.xfs -i size=512 /dev/brick/brick01
- Create a mount directory for the brick
mkdir -p /bricks/brick01
- Add the brick mount to
/etc/fstab
/dev/brick/brick01 /bricks/brick01 xfs rw,noatime,inode64,nouuid 1 2
- Mount the volume
mount -a
- Check the volume has mounted
df -h
Example output
Filesystem                 Size  Used Avail Use% Mounted on
devtmpfs                   3.8G     0  3.8G   0% /dev
tmpfs                      3.9G     0  3.9G   0% /dev/shm
tmpfs                      3.9G   17M  3.9G   1% /run
tmpfs                      3.9G     0  3.9G   0% /sys/fs/cgroup
/dev/vda1                   40G  1.1G   39G   3% /
tmpfs                      783M     0  783M   0% /run/user/0
/dev/mapper/brick-brick01   10G   33M   10G   1% /bricks/brick01
Create a
brickdirectory on the mount point
mkdir -p /bricks/brick01/brick
Now we will move on to configuring Gluster
These steps need to be done from one Gluster node. Here we’ll be using
gluster01
- Confirm that the node can resolve the other node’s IP address
ping -c 3 gluster02
Example output
PING gluster02.gluster.lab (10.44.50.96) 56(84) bytes of data.
64 bytes from gluster02.gluster.lab (10.44.50.96): icmp_seq=1 ttl=64 time=0.495 ms
64 bytes from gluster02.gluster.lab (10.44.50.96): icmp_seq=2 ttl=64 time=0.572 ms
64 bytes from gluster02.gluster.lab (10.44.50.96): icmp_seq=3 ttl=64 time=0.578 ms

--- gluster02.gluster.lab ping statistics ---
3 packets transmitted, 3 received, 0% packet loss, time 2001ms
rtt min/avg/max/mdev = 0.495/0.548/0.578/0.042 ms
Probe the other node to add it to the cluster.
gluster peer probe gluster02
- Confirm that the node has been added to the cluster
gluster peer status
Example output
Number of Peers: 1

Hostname: gluster02
Uuid: fe542742-d0f4-4e1a-aebd-a745231045f0
State: Peer in Cluster (Connected)
Now create a Gluster volume. Due to it being created over 2 bricks, there is a high risk of split-brain and so the create command will need a
forceflag
gluster volume create volume01 replica 2 \
  gluster01:/bricks/brick01/brick \
  gluster02:/bricks/brick01/brick \
  force
- Check the volume has been created
gluster volume list
Example output
volume01Once confirmed, the volume can now be started
gluster volume start volume01
- Check the status of the volume
gluster volume status volume01
- Example output
Status of volume: volume01
Gluster process                             TCP Port  RDMA Port  Online  Pid
------------------------------------------------------------------------------
Brick gluster01:/bricks/brick01/brick       49152     0          Y       17527
Brick gluster02:/bricks/brick01/brick       49152     0          Y       16825
Self-heal Daemon on localhost               N/A       N/A        Y       17548
Self-heal Daemon on gluster02               N/A       N/A        Y       16846

Task Status of Volume volume01
------------------------------------------------------------------------------
There are no active volume tasks
The volume is now set up and ready to be used by a client. Mounting the volume and setting up a test is detailed here
Ansible Setup⌗
Within the GitHub repository there is an ansible directory. Here we need to edit the inventory.yaml files to ensure the IP addresses are correct.
- Get the current IP addresses from libvirt DHCP
virsh net-dhcp-leases gluster-lab
Example output
 Expiry Time           MAC address         Protocol   IP address        Hostname    Client ID or DUID
-------------------------------------------------------------------------------------------------------
 2021-01-19 12:21:58   52:54:00:37:8d:b7   ipv4       10.44.50.77/24    gluster03   -
 2021-01-19 12:20:10   52:54:00:57:19:d6   ipv4       10.44.50.100/24   gluster01   -
 2021-01-19 12:22:51   52:54:00:92:b1:b7   ipv4       10.44.50.10/24    client01    -
 2021-01-19 12:21:04   52:54:00:af:99:34   ipv4       10.44.50.12/24    gluster02   -
Go to the Ansible directory
cd ~/kvm-gluster-lab/ansible
Edit the
invetory.yamlfile and update theansible_hostlines to reflect the nodes addressesvim inventory.yamlExample output
---

gluster:
  hosts:
    gluster01:
      ansible_host: 10.44.50.100
    gluster02:
      ansible_host: 10.44.50.12

gluster_extended:
  hosts:
    gluster03:
      ansible_host: 10.44.50.77

gluster_client:
  hosts:
    client01:
      ansible_host: 10.44.50.10
Once the inventory file is updated, run the
initial_setup.yamlplaybook
ansible-playbook -i inventory.yaml initial_setup.yaml
- Demo of the Ansible Install
Setup Client⌗
Here we’ll look at mounting the volume with Glusterfs
All steps here are run from
client01
- Install the Gluster client
yum install glusterfs glusterfs-fuse -y
- Test mounting the Gluster volume with fuse
mount -t glusterfs gluster01:/volume01 /mnt
- Check it has mounted
df -h
Example output
Filesystem           Size  Used Avail Use% Mounted on
devtmpfs             1.9G     0  1.9G   0% /dev
tmpfs                1.9G     0  1.9G   0% /dev/shm
tmpfs                1.9G   17M  1.9G   1% /run
tmpfs                1.9G     0  1.9G   0% /sys/fs/cgroup
/dev/vda1             40G  922M   40G   3% /
tmpfs                379M     0  379M   0% /run/user/0
gluster01:/volume01   10G  135M  9.9G   2% /mnt
Unmount Gluster
umount /mnt
Depending on the style of testing needed against the volume will depend on how the volume is mounted. Here is an example for mounting the volume to the /home directory
- Example
/etc/fstabmount
gluster01:/volume01 /home glusterfs defaults 0 0
- Mount the volume
mount -a
- Check mount
df -h
- Example output
Filesystem           Size  Used Avail Use% Mounted on
devtmpfs             1.9G     0  1.9G   0% /dev
tmpfs                1.9G     0  1.9G   0% /dev/shm
tmpfs                1.9G   17M  1.9G   1% /run
tmpfs                1.9G     0  1.9G   0% /sys/fs/cgroup
/dev/vda1             40G  922M   40G   3% /
tmpfs                379M     0  379M   0% /run/user/0
gluster01:/volume01   10G  135M  9.9G   2% /home
Checkpoint⌗
At this point there should be a two node Gluster cluster, with one volume exported to a client.
The next section will detail adding the third node and extending the Gluster volume over this node.
If this is as far as the lab is required, see the cleanup section to remove the lab.
Third Replica⌗
In this section we will configure the third node and add it into the Gluster Volume. As with the setup Gluster steps, there will be a manual setup and an Ansible setup
Setup Gluster⌗
- First power on
gluster03
virsh start gluster03.gluster.lab
- Confirm the virtual machine has started
vish list
- Example output
 Id   Name                    State
---------------------------------------
 9    gluster01.gluster.lab   running
 10   gluster02.gluster.lab   running
 11   gluster03.gluster.lab   running
 12   client01.gluster.lab    running
Manual Setup⌗
The following steps will need running on
gluster03
- (Optional) Install a text editor of choice.
viis available on the nodes
yum install -y vim
- Install the Gluster yum repository. Here we will be installing Gluster 6 so that this lab can be used for a future lab.
yum install centos-release-gluster6 -y
- Now install glusterfs server
yum install glusterfs-server -y
- Enable the Gluster service
systemctl enable glusterd
- Start the Gluster service
systemctl start glusterd
- Add the first disk to a Physical Volume
pvcreate /dev/vdb
- Add the second disk to a Physical Volume
pvcreate /dev/vdc
- Confirm both drives are visible as Physical Volumes
pvs
Example output
  PV         VG Fmt  Attr PSize PFree
  /dev/vdb      lvm2 ---  5.00g 5.00g
  /dev/vdc      lvm2 ---  5.00g 5.00g
Create the Volume group
vgcreate brick /dev/vdb /dev/vdc
- Check the Volume Group
vgs
Example output
  VG    #PV #LV #SN Attr   VSize VFree
  brick   2   0   0 wz--n- 9.99g 9.99g
Create the Logical Volume for the Gluster brick
lvcreate -l 100%FREE -T brick -n brick01
- Check Logical Volume has created
lvs
Example output
  LV      VG    Attr       LSize  Pool Origin Data%  Meta%  Move Log Cpy%Sync Convert
  brick01 brick twi-a-tz-- <9.97g             0.00   10.61
Create a filesystem on the Logical Volume
mkfs.xfs -i size=512 /dev/brick/brick01
- Create a mount directory for the brick
mkdir -p /bricks/brick01
- Add the brick mount to
/etc/fstab
/dev/brick/brick01 /bricks/brick01 xfs rw,noatime,inode64,nouuid 1 2
- Mount the volume
mount -a
- Check the volume has mounted
df -h
Example output
Filesystem                 Size  Used Avail Use% Mounted on
devtmpfs                   3.8G     0  3.8G   0% /dev
tmpfs                      3.9G     0  3.9G   0% /dev/shm
tmpfs                      3.9G   17M  3.9G   1% /run
tmpfs                      3.9G     0  3.9G   0% /sys/fs/cgroup
/dev/vda1                   40G  1.1G   39G   3% /
tmpfs                      783M     0  783M   0% /run/user/0
/dev/mapper/brick-brick01   10G   33M   10G   1% /bricks/brick01
Create a
brickdirectory on the mount point
mkdir -p /bricks/brick01/brick
Ansible Setup⌗
Within the GitHub repository there is an ansible directory. Assuming that the inventory.yaml was setup in a previous step we will just run the playbook for gluster03
- Move to the Ansible directory
cd ~/kvm-gluster-lab/ansible
- Run the playbook
ansible-playbook -i inventory.yaml third_node.yaml
Add Replica⌗
These steps need to be run from an existing Gluster node.
- Probe the new node
gluster peer probe gluster03
- Confirm the new node has been added
gluster peer status
Example output
Number of Peers: 2

Hostname: gluster02
Uuid: b13fffb6-a127-4895-857c-8cce6f2dd34c
State: Peer in Cluster (Connected)

Hostname: gluster03
Uuid: 9b03a0e9-77dd-4a70-a98b-141842fb92c1
State: Peer in Cluster (Connected)
Check the current volume
gluster volume status volume01
Example output
Status of volume: volume01
Gluster process                             TCP Port  RDMA Port  Online  Pid
------------------------------------------------------------------------------
Brick gluster01:/brick/brick01/brick        49153     0          Y       19468
Brick gluster02:/brick/brick01/brick        49153     0          Y       18167
Self-heal Daemon on localhost               N/A       N/A        Y       19489
Self-heal Daemon on gluster02               N/A       N/A        Y       18188
Self-heal Daemon on gluster03               N/A       N/A        Y       17326

Task Status of Volume volume01
------------------------------------------------------------------------------
There are no active volume tasks
Add the new brick on
gluster03to the volume
gluster volume add-brick volume01 replica 3 gluster03:/brick/brick01/brick
- Check the new brick has been added to the volume
gluster volume status volume01
Example output
Status of volume: volume01
Gluster process                             TCP Port  RDMA Port  Online  Pid
------------------------------------------------------------------------------
Brick gluster01:/brick/brick01/brick        49153     0          Y       19468
Brick gluster02:/brick/brick01/brick        49153     0          Y       18167
Brick gluster03:/brick/brick01/brick        49152     0          Y       17384
Self-heal Daemon on localhost               N/A       N/A        Y       20024
Self-heal Daemon on gluster02               N/A       N/A        Y       18596
Self-heal Daemon on gluster03               N/A       N/A        Y       17405

Task Status of Volume volume01
------------------------------------------------------------------------------
There are no active volume tasks
Trigger a volume heal once it’s confirmed the new brick is in the volume
gluster volume heal volume01
- Check the status of the volume heal
gluster volume heal volume01 info
- Example output of when the heal has finished
Brick gluster01:/brick/brick01/brick
Status: Connected
Number of entries: 0

Brick gluster02:/brick/brick01/brick
Status: Connected
Number of entries: 0

Brick gluster03:/brick/brick01/brick
Status: Connected
Number of entries: 0
Summary⌗
By this point there should be a three node Gluster cluster, with a 3x replicated volume presented to a client machine.
The cleanup section below will remove everything create by this lab.
Cleanup⌗
Within the GitHub repository is a teardown.sh script, that will remove all the VMs, the storage and the network.
- To clean up the lab
bash ~/kvm-gluster-lab/teardown.sh